Cheap and Simple Deep Sky Astrophotography by Nick Hart
Open almost any astronomy book and you will see photos of star clusters, nebulae, planets and so on. These photographs show our sky as it really is, clouds of gas and dust, out in the depths of deep space and colourful. As astronomers we view the sky through our telescopes and we see more than the naked eye. But with photographs we see even more and have lasting views which we can always refer to.
With these thoughts I decided to try out astrophotography. I first started with a Russian camera, a Zenith 35 mm single lens reflex camera (SLR) a cable release and a sturdy tripod.
So let's start off with a fixed camera on a tripod, a fast 50 mm lens, let's say F2, focus the lens to infinity and set the shutter speed on B setting (timed exposure) with the cable release set in place. Set the cable release on the lock setting for longer exposures. Next point the camera and place a piece of black card in front of the lens and you are ready to start your first exposures. Bracket your exposures from 10 to 40 seconds, try different exposures times to get your best results, after exposing replace the black card before closing the shutter. the black card will prevent camera shake.
In astrophotography there is a simple rule of thumb - divide 500 by F (the focal length of your lens). Thus, with a 50 mm lens you can take a 10 seconds (500/50 = 10) exposure and should not see any sign of star trailing.
Films - Start off by using slides, the main advantage with slides is that they give you far greater contrast than print film but, in saying that, some print films can give nice results.
Personally, I would recommend Kodak Ektachrome Elite 2. 100 and 400 speed. This film has a nice colour balance towards the blues and reds. Fuji chrome Prove is more towards the greens but useful in light polluted areas.
Print films, Ektar 1,000 and Fuji colour super G 400, have a nice colour balance towards the blues and greens where Kodak Gold more towards the reds - more suitable for emission nebulae such as the Orion nebula.
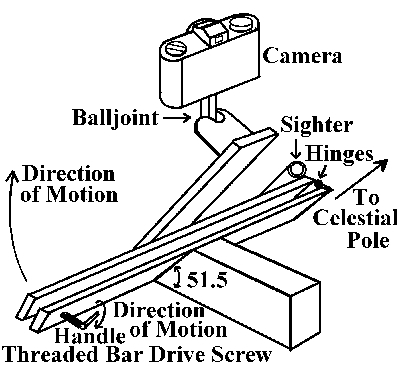
To get good results try building yourself a Haig Mount. The Haig Mount is a simple device that is easy to use and make. It is a tracking device designed to track stars due to the rotation of good old mother Earth. It consists of two planks of wood (36 cm x 150 cm x 2 cm) hinged at one end with a threaded bar at the other end with a handle on it. As you turn the handle it moves the upper plank therefore tracking the Earth’s rotation. The axis consisting the hinges points to the celestial pole. The pole is approximately at Cardiff 51.50 North. Construct a wedge of wood measuring (15 cm x 10 cm x 5 cm). Cut off at one end at 51.50 and attach it to the centre of the lower plank to get the polar alignment. The threaded bar must be placed 33 cm from the hinges with a pitch of 1.5 mm. Attach a camera ball joint to the upper plank to enable you to point the camera in different directions.
The main advantage of this device is one can take longer exposures without star trailing, but only up to a 200 mm lens. A 200 mm lens will give exposures up to 30 seconds, but a 50 mm lens can enable you to give longer exposures up to 5 minutes.
At this point Deep Sky objects can be photographed such as M42 (the Orion nebula), the Vale nebula and the North American nebula. You are limited by the darkness of your local sky and light pollution, so to achieve good results, drive to a dark site out in the countryside. The only other alternative is to buy a deep sky filter, light pollution filter, which can be expensive.
Try to make a Haig Mount if you are interested, if you run into any problems contact me or see me at the Society talks. I would be interested in your results.

